혹시 Claude나 ChatGPT를 쓰면서 "이 AI가 내 데이터베이스에 직접 접근할 수 있으면 얼마나 편할까?" 생각해본 적 있으신가요? 아니면 Slack 메시지를 AI가 읽고, GitHub 이슈를 자동으로 생성해주면 좋겠다는 상상이요. 근데 각 도구마다 API 연동 코드를 따로 짜야 하고, 인증 방식도 다르고, 데이터 포맷도 제각각이라 매번 삽질하게 됩니다.

AI와 외부 도구의 연결, 이제 표준이 생겼다 | 사진: 2H Media, Unsplash
MCP(Model Context Protocol)가 바로 이 문제를 해결합니다. Anthropic이 2024년 11월에 발표한 이 오픈 프로토콜은 이제 OpenAI, Microsoft, Google까지 채택하면서 사실상 AI 에이전트의 USB 포트가 됐습니다. 이 글에서는 Python으로 MCP 서버를 직접 만들고 Claude Desktop에 연결하는 전체 과정을 다룹니다.
TL;DR
MCP는 AI 앱과 외부 데이터·도구를 표준화된 방식으로 연결하는 오픈 프로토콜입니다. Python FastMCP 라이브러리를 사용하면 데코레이터 몇 줄로 커스텀 도구 서버를 만들 수 있고, Claude Desktop의 설정 파일에 등록하면 바로 사용 가능합니다.
MCP란 무엇인가? USB-C 비유로 이해하기
MCP는 쉽게 말해 "AI를 위한 USB-C"입니다. Anthropic 공식 블로그의 표현을 빌리자면, 각 데이터 소스마다 별도 커넥터를 만드는 대신 하나의 표준 프로토콜로 모든 걸 연결하자는 겁니다 (2024년 11월 기준, Anthropic 공식 발표).
기존 방식과 MCP 방식의 차이를 비교하면 이렇습니다.
항목 기존 방식 MCP 방식 연결 방식 도구마다 별도 API 코드 표준 프로토콜 하나로 통일 인증 각각 OAuth, API Key 등 개별 구현 MCP 프레임워크에서 일괄 관리 재사용 앱마다 새로 구현 한번 만든 서버를 여러 AI 앱에서 공유 생태계 폐쇄적 오픈소스, 커뮤니티 서버 공유 MCP 서버가 제공할 수 있는 기능은 크게 세 가지입니다:
Resources: 파일이나 API 응답 같은 읽기 전용 데이터 Tools: LLM이 호출할 수 있는 함수 (사용자 승인 필요) Prompts: 특정 작업을 위한 사전 정의 템플릿 이 중 Tools가 가장 많이 쓰이고, 오늘 실습에서도 Tools 중심으로 진행합니다. MCP 공식 문서에 따르면, 서버 하나로 여러 클라이언트(Claude Desktop, 커스텀 앱 등)에 동시 연결이 가능합니다 (2026년 3월 기준).
이전에 n8n 블로그 자동화에서 AI 도구를 워크플로우에 통합하는 과정을 다뤘는데요, MCP는 그보다 훨씬 저수준에서 AI와 도구의 연결을 표준화합니다.
사전 준비: 환경 세팅
시작하기 전에 필요한 것들입니다.
항목 버전/요구사항 Python 3.10 이상 uv (패키지 매니저) 최신 버전 Claude Desktop 최신 버전 (무료 플랜 OK) OS macOS, Windows, Linux 테스트 환경 macOS, M3 Pro, 36GB RAM # uv 설치 (없다면) curl -LsSf https://astral.sh/uv/install.sh | sh # 프로젝트 초기화 mkdir mcp-demo && cd mcp-demo uv init uv add "mcp[cli]" httpx # 서버 파일 생성 touch server.py uv를 처음 쓰시는 분도 계실 텐데, pip보다 훨씬 빠르고 가상환경 관리가 깔끔합니다. MCP 공식 문서에서 uv를 기본으로 쓰길래 저도 이번에 갈아탔는데, 의존성 설치가 체감 5배는 빠르더라고요.
Step 1: 첫 번째 MCP 서버 만들기
날씨 정보를 가져오는 간단한 MCP 서버를 만들어보겠습니다. MCP 공식 튜토리얼의 예제를 기반으로 하되, 제가 실무에서 쓸 법한 형태로 조금 변형했습니다.
server.py from mcp.server.fastmcp import FastMCP import httpx # FastMCP 서버 인스턴스 생성 mcp = FastMCP("weather-demo") # 미국 국립기상청 API 기본 URL NWS_API = "https://api.weather.gov" HEADERS = {"User-Agent": "mcp-weather-demo/1.0"} @mcp.tool() async def get_forecast(latitude: float, longitude: float) -> str: """지정한 좌표의 날씨 예보를 가져옵니다. Args: latitude: 위도 (예: 37.5665 = 서울) longitude: 경도 (예: 126.9780 = 서울) """ async with httpx.AsyncClient() as client: # 1단계: 좌표로 격자점 조회 points_url = f"{NWS_API}/points/{latitude},{longitude}" resp = await client.get(points_url, headers=HEADERS) if resp.status_code != 200: return f"격자점 조회 실패: {resp.status_code}" forecast_url = resp.json()["properties"]["forecast"] # 2단계: 예보 데이터 가져오기 forecast_resp = await client.get(forecast_url, headers=HEADERS) periods = forecast_resp.json()["properties"]["periods"] # 처음 3개 기간만 반환 result = [] for p in periods[:3]: result.append( f" {p['name']}: {p['temperature']}°{p['temperatureUnit']}\n" f" {p['detailedForecast']}" ) return "\n\n".join(result) @mcp.tool() async def get_alerts(state: str) -> str: """미국 주(state)의 기상 경보를 조회합니다. Args: state: 미국 주 약어 (예: CA, NY, TX) """ async with httpx.AsyncClient() as client: url = f"{NWS_API}/alerts/active?area={state}" resp = await client.get(url, headers=HEADERS) alerts = resp.json().get("features", []) if not alerts: return f"{state} 지역에 활성 경보가 없습니다." result = [] for alert in alerts[:5]: props = alert["properties"] result.append( f"⚠️ {props['event']}\n" f" 심각도: {props['severity']}\n" f" {props['headline']}" ) return "\n\n".join(result) if __name__ == "__main__": mcp.run(transport="stdio") 여기서 핵심은 @mcp.tool() 데코레이터입니다. 이걸 붙이면 FastMCP가 함수의 타입 힌트와 docstring을 읽어서 자동으로 도구 스키마를 생성합니다. TypeScript SDK에서는 Zod 스키마를 직접 작성해야 하는데, Python은 이게 알아서 되니까 훨씬 편하더라고요. 이건 공식 문서에는 잘 안 나와 있는 팁인데요, docstring의 Args 섹션을 Google 스타일로 쓰면 파라미터 설명까지 자동 추출됩니다.
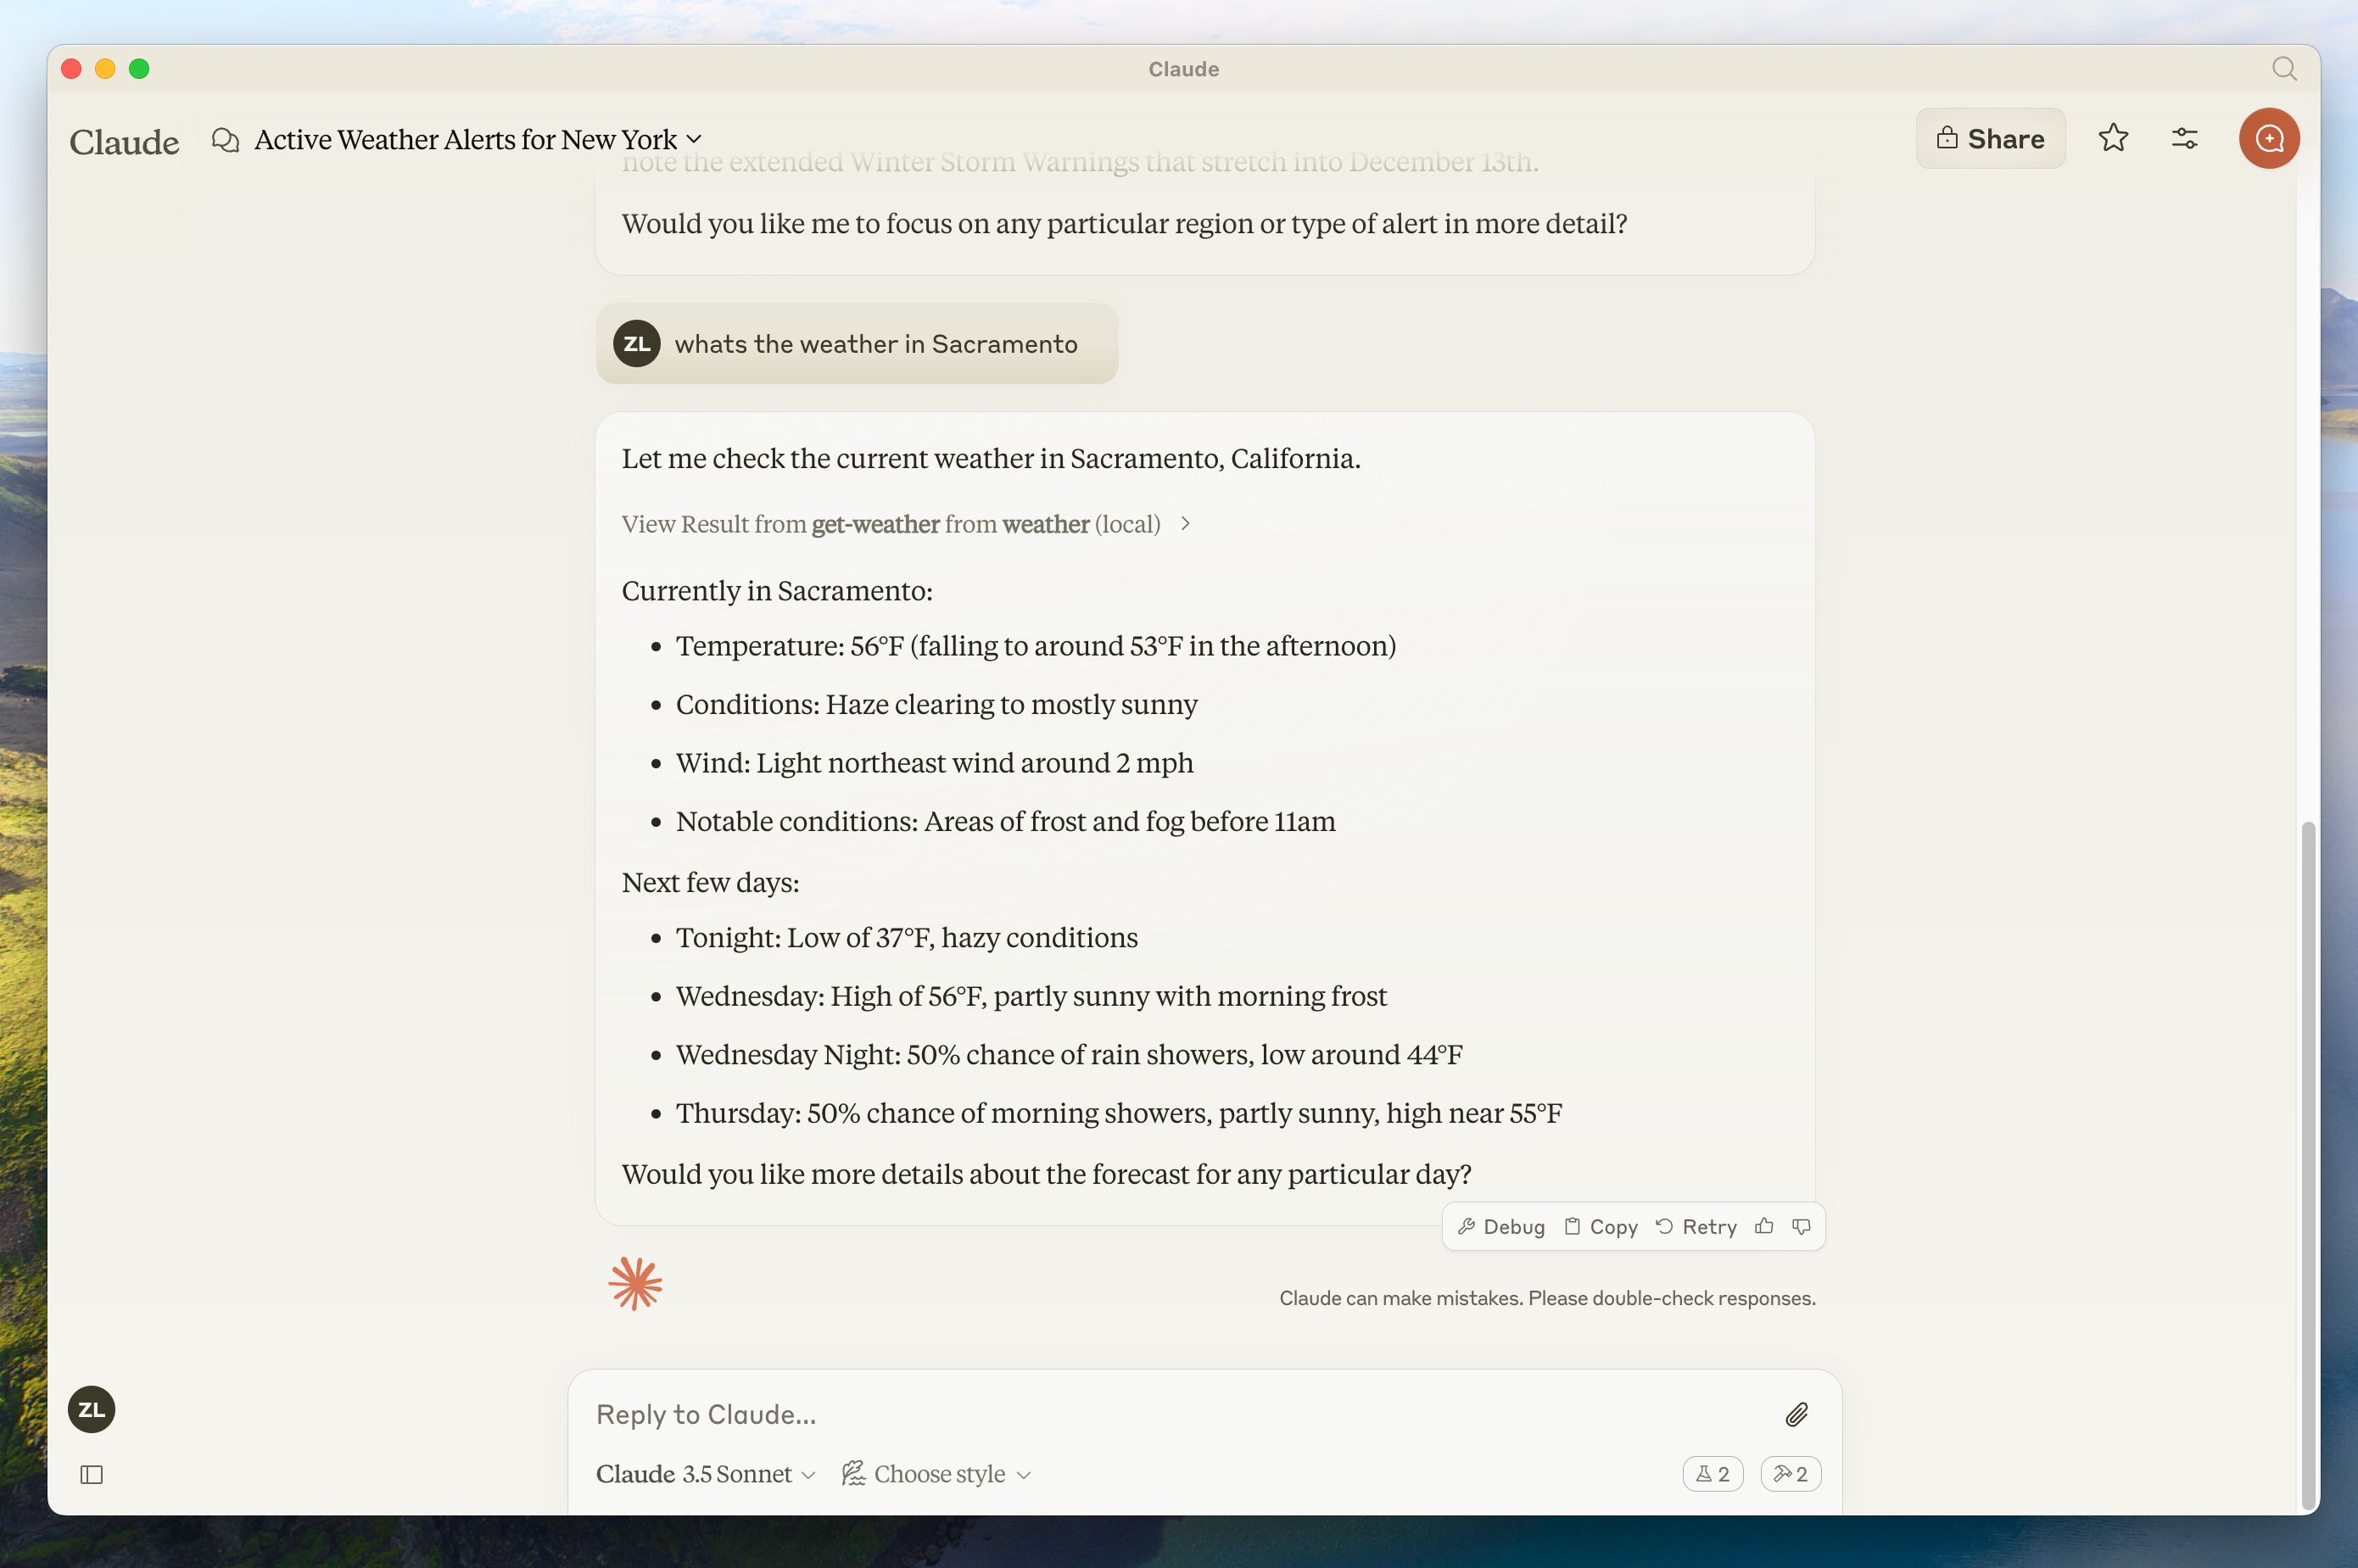
출처: MCP 공식 문서 | Claude Desktop에서 MCP 날씨 도구를 호출한 결과
Step 2: Claude Desktop에 연결하기
서버를 만들었으니 이제 Claude Desktop에 등록합니다.
Claude Desktop의 설정 파일을 열어야 합니다. macOS 기준으로:
Claude Desktop 설정 파일 열기 code ~/Library/Application\ Support/Claude/claude_desktop_config.json 아래 내용을 추가하세요:
{ "mcpServers": { "weather-demo": { "command": "uv", "args": [ "--directory", "/Users/yourname/mcp-demo", "run", "server.py" ] } } } 경로를 본인 프로젝트 디렉토리로 바꾸는 거 잊지 마세요. 저는 처음에 이걸 안 바꿔서 "서버 연결 실패" 에러가 떴었습니다 (웃음). 설정 파일 저장 후 Claude Desktop을 재시작하면, 채팅 입력창 옆에 망치 아이콘이 나타납니다. 그걸 클릭하면 방금 만든 get_forecast와 get_alerts 도구가 보입니다.
Stainless의 MCP SDK 비교 가이드에 따르면, Python SDK가 "빠른 프로토타이핑에 가장 적합"하고 TypeScript SDK는 "프로덕션 배포에 더 견고"하다고 합니다 (2026년 3월 기준). 사이드 프로젝트나 내부 도구용이라면 Python으로 충분합니다.
Step 3: MCP Inspector로 디버깅하기
Claude Desktop에 연결하기 전에, MCP Inspector로 서버를 먼저 테스트하는 게 좋습니다.
MCP Inspector 실행 npx @modelcontextprotocol/inspector uv run server.py 브라우저에서 Inspector UI가 열리면, 등록된 도구 목록을 확인하고 직접 호출해볼 수 있습니다. 이 Inspector 없었으면 디버깅이 많이 힘들었을 겁니다. 서버가 어떤 스키마를 노출하는지, 어떤 응답을 반환하는지 실시간으로 볼 수 있거든요.
이전에 다뤘던 GPT-5.4 팩트체킹 워크플로우에서도 외부 검색 API를 교차 검증에 썼는데요, 그 외부 API 호출 부분을 MCP 서버로 만들면 Claude Desktop에서 바로 팩트체킹이 가능해집니다. 이게 MCP의 진짜 매력이에요.

MCP 서버 개발은 일반 Python 개발과 크게 다르지 않다 — Photo: Bernd Dittrich/Unsplash
자주 발생하는 에러와 해결법
제가 직접 겪은 삽질 TOP 3입니다.
1. "Server disconnected" 에러
가장 흔한 원인은 claude_desktop_config.json의 경로 오류입니다. command에 uv의 전체 경로를 지정하면 해결되는 경우가 많습니다:
uv 전체 경로 확인 which uv # 예: /Users/yourname/.local/bin/uv 설정에서 "command": "uv" 대신 전체 경로를 넣어보세요.
2. "Tool not found" — 도구가 안 보이는 경우
@mcp.tool() 데코레이터를 붙였는데도 도구가 목록에 안 나타나면, async def 대신 def로 작성했는지 확인하세요. FastMCP는 동기/비동기 둘 다 지원하지만, HTTP 호출이 포함된 도구는 async def가 안정적입니다.
3. 타임아웃 에러
외부 API 호출이 느리면 MCP 기본 타임아웃(30초)에 걸릴 수 있습니다. httpx.AsyncClient(timeout=60.0) 처럼 타임아웃을 늘려주세요. 저는 NWS API가 간헐적으로 느려서 이것 때문에 30분 날렸습니다.
MCP가 표준이 된 이유: 생태계 현황
Wikipedia의 MCP 문서에 따르면, 2026년 3월 기준으로 OpenAI, Microsoft, Google이 모두 MCP를 자사 AI 플랫폼에 채택했습니다. Anthropic이 만들었지만 이제 특정 회사의 프로토콜이 아닌 거죠.
GitHub의 MCP 조직에는 이미 공식 SDK가 Python, TypeScript, Go로 제공되고, 커뮤니티에서 만든 MCP 서버가 수백 개 공유되고 있습니다. Slack, GitHub, PostgreSQL, Google Drive 등 웬만한 서비스는 이미 누군가 MCP 서버로 만들어뒀습니다.
SDK 장점 적합한 상황 Python (FastMCP) 데코레이터로 빠른 개발, 타입 자동 추론 프로토타이핑, 데이터 분석 도구 TypeScript 엄격한 타입, 프로덕션 안정성 웹 서비스 통합, 대규모 배포 Go 고성능, 낮은 메모리 인프라 도구, 대용량 처리
정리 + 다음 단계
MCP는 AI 에이전트 시대의 핵심 인프라입니다. 지금 당장 사이드 프로젝트에서 써볼 만합니다.
정리하면:
FastMCP + Python: 30분이면 커스텀 서버 완성 Claude Desktop 연결: JSON 설정 한 줄로 끝 MCP Inspector: 디버깅 필수 도구 생태계: 이미 수백 개의 커뮤니티 서버 존재

MCP는 AI 생태계의 연결 표준이 되고 있다 (Photo by Ecliptic Graphic on Unsplash)
다음 글에서는 실제로 쓸모 있는 MCP 서버 — 사내 PostgreSQL DB에 자연어로 쿼리하는 도구 — 를 만들어볼 계획입니다. Anthropic의 MCP 고급 과정에서 다루는 sampling, notification 같은 고급 기능도 함께 다뤄보겠습니다.
참고 자료:
- Introducing the Model Context Protocol | Anthropic 공식 블로그 (2024년 11월)
- Build an MCP Server | MCP 공식 문서 (2026년 3월)
- MCP SDK Comparison | Stainless (2026년 3월)
- Model Context Protocol | Wikipedia (2026년 3월)
- MCP GitHub Organization (2026년 3월)
- MCP Explained: Build Your First Server | DEV Community (2026년)
더 읽어볼 만한 글:
- GPT-5.4 '가장 정확한 모델' 활용법: 환각 33% 감소, 실무 팩트체킹 워크플로우 만들기 - MCP로 팩트체킹 API를 연결하면 더 강력해진다
- Claude Code로 2주 만에 일본어 학습 SaaS 완성하기: Utakoto 제작기 - Claude 생태계에서 AI 도구를 활용하는 실전 사례